Showing posts with label Blogger. Show all posts

Thursday, February 19, 2009

Make Horizontal Menu Bar Like My Blog


If see the menu bar on the header of my blog quite interesting and good enough suitable with red and black color, may be among you also want to have a menu bar like my blog, if so,in this opportunity I will share about how to make horizontal menu bar like that, and let's enhance your blog.
First,prepare the left image and the right image like below and upload to the free image hosting of your favorite, if you lazy to do that,just use the image below by right click on the image and select copy image location.

Left image

left image
Right image

right image


After that,as usual follow the steps below:

1. Log in to Blogger with your account.
2. On the dashboard menu select templates.
3. On the templates menu select edit HTML.
4. Copy-paste the code below before the ]]></b:skin> code

/*credits : http://nazarpunya.blogspot.com */
#tabs {
float:left;
width:100%;
background:#CC0000;
font-size:93%;
line-height:normal;
border-bottom:none;
}
#tabs ul {
margin:0;
padding:10px 10px 0 50px;
list-style:none;
}
#tabs li {
display:inline;
margin:0;
padding:0;
}
#tabs a {
float:left;
background:url("Left image URL") no-repeat left top;
margin:0;
padding:0 0 0 5px;
text-decoration:none;
}
#tabs a span {
float:left;
display:block;
background:url("Right image URL") no-repeat right top;
padding:5px 15px 4px 6px;
color:#0000FF;
}
/* Commented Backslash Hack hides rule from IE5-Mac \*/
#tabs a span {float:none;}
/* End IE5-Mac hack */
#tabs a:hover span {
color:#CC0000;
}
#tabs a:hover {
background-position:0% -42px;
}
#tabs a:hover span {
background-position:100% -42px;
}


5. On the body tag search for the code below:
<div id='header-wrapper'>
<b:section class='header' id='header' maxwidgets='1' showaddelement='no'>
<b:widget id='Header1' locked='true' title='(Header)' type='Header'/>
</b:section>
</div>


And replace the maxwidgets='1' with maxwidgets='3' or more from the value, and replace the showaddelement='no' with showaddelement='yes'.

6. After that copy and paste the code below after the </b:section> above and replace the link and the link name with your's:
<div id="tabs">
<ul>
<li><a href="link 1"><span>link name 1</span></a></li>
<li><a href="link 2"><span>link name 2</span></a></li>
<li><a href="link 3"><span>link name 3</span></a></li>
</ul>
</div>

7. Note,if the method above doesn't work and you have got error you can parse the HTML above by clicking here.

Click here to get your free mobile phone or apple ipod

Good WordPress and Blogger Templates Sites


Modifying templates is a self excitement as a blogger especially if the results was good, but sometimes do this things that we spend a lot of time. May be better for us to use templates that are ready to use, so in this case I will share about the good sites with the huge collection of templates that are offer templates to download as a destination for you to choose which templates for your blog and the sites are listed below:

Free WordPress Templates
1. www.prowordpressthemes.com
2. www.wordpresstemplates.com
3. wordpresstemplates.name
4. www.skinpress.com
5. wordpress.org
6. topwpthemes.com
7. www.blogohblog.com
8. www.templatesbrowser.com
9. www.wpskins.org
10. www.freewordpresstheme.info

Free Blogger Templates
1. blogger-templates.blogspot.com
2. www.finalsense.com
3. www.ourblogtemplates.com
4. www.bloggerstyles.com
5. www.eblogtemplates.com
6. www.blogspottemplate.com
7. btemplates.com
8. www.bloggerbuster.com
9. bloggertemplates.name
10. freeblogger-templates.blogspot.com

Premium WordPress Templates
1. www.wordpressthemesmarket.com
2. wpcandy.com
3. www.web20-templates.com
5. wpremix.com
6. ithemes.com
7. www.wp-magazine.com
8. www.studiopress.com
9. www.wp-vybe.com
10. www.premiumwp.com

Click here to get your free mobile phone or apple ipod

Monday, January 26, 2009

Add AdSense Between Blog Post On New Blogger


In this page I will share tips about how to easily add AdSense between blog post on new blogger .Follow the steps below:
1.Log in to Blogger with your account.
2.On the dashboard menu select template , here you will see the page elements see the image below:


dashboard


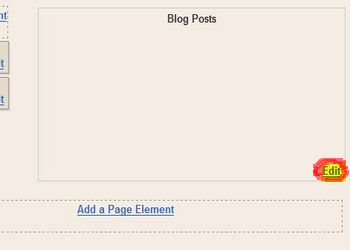
3.Then on the page elements you will see the frame of edit post like the image below:


edit post


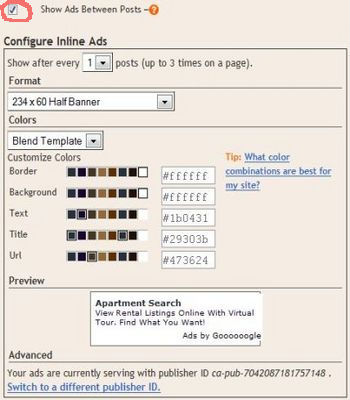
4.After you click on edit section a window will be loaded,select and tick the check box for Show Ads Between Posts settings under Select Items section.Then you can set the AdSense unit with your desire, see the image below:


adsense unit


5.Click on save changes button when done and finish the job and your AdSense unit will be appear shortly.

Click here to get your free mobile phone or apple ipod

Sunday, January 18, 2009

Tag Cloud Label (Blogumulus)


When visiting a friend blogs, I am surprise viewing a Tag Cloud, which posts looks float and continue to rotate through when the cursor is directed, so flashing.

I get the information that the Tag Cloud can only be made in a blog-based Wordpress.Then how to apply on Blogger?

And I find information about this Tag Cloud , finally see Blogger Buster.It happened when I find what is sought - a search namely how to create Tag Cloud Label (Blogumulus).
Tags Cloud Label (Blogumulus) is a label that rotate that we can enhance a blog, in addition to rotate as globe, label tags can also be made as link.
The first thing you have to do is go to edit HTML of the template, and tick the check box for Expand Widget Templates in edit HTML,you have to backup template to avoid errors in editing,after that you look for this code:

<b:section class='sidebar' id='sidebar' preferred='yes'>
or code
<b:section class='sidebar' id='sidebar2' preferred='yes'>


After you see it then copy-paste the code below after the code above:

<b:widget id='Label99' locked='false' title='Labels' type='Label'>
<b:includable id='main'>

<b:if cond='data:title'>

<h2><data:title/></h2>

</b:if>

<div class='widget-content'>


<script src='http://halotemplates.s3.amazonaws.com/wp-cumulus-example/swfobject.js' type='text/javascript'/>

<div id='flashcontent'>Blogumulus by <a href='http://www.roytanck.com/'>Roy Tanck</a> and <a href='http://www.bloggerbuster.com'>Amanda Fazani</a></div>

<script type='text/javascript'>


var so = new SWFObject(&quot;http://halotemplates.s3.amazonaws.com/wp-cumulus-example/tagcloud.swf&quot;, &quot;tagcloud&quot;, &quot;240&quot;, &quot;300&quot;, &quot;7&quot;, &quot;#ffffff&quot;);

// uncomment next line to enable transparency

//so.addParam(&quot;wmode&quot;, &quot;transparent&quot;);


so.addVariable(&quot;tcolor&quot;, &quot;0x333333&quot;);

so.addVariable(&quot;mode&quot;, &quot;tags&quot;);

so.addVariable(&quot;distr&quot;, &quot;true&quot;);


so.addVariable(&quot;tspeed&quot;, &quot;100&quot;);

so.addVariable(&quot;tagcloud&quot;, &quot;<tags><b:loop values='data:labels' var='label'><a expr:href='data:label.url' style='12'><data:label.name/></a></b:loop></tags>&quot;);


so.addParam(&quot;allowScriptAccess&quot;, &quot;always&quot;);

so.write(&quot;flashcontent&quot;);

</script>

<b:include name='quickedit'/>

</div>


</b:includable>

</b:widget>

You save the template, and you will see the results,if the display of color and width of the label does not fit with your desire,you can change it,
how to change the width and height label you find the code:
&quot;240&quot;,&quot;300&quot;

you simply change the value, and would change color if your background search code:
&quot;# ffffff&quot;
); (default is a white ------> ffffff)
to change the color of this you find the code:
&quot;0x333333&quot;);

Click here to get your free mobile phone or apple ipod

Thursday, January 15, 2009

Simple Ways Getting Back Links


One factor to increase the traffic rank of a blog or website that is back links. The more back links owned by a blog, then the possibility to obtain a high rank would be great. The question now is, how to get back links ?

Actually this is not a difficult matter. I have a 1 way to get back links easily. Due to me not an SEO experts, of course the way of this is just a simple method. If you like how simple alias does not need high level techniques, this post is for you.Based on personal experience, I find that this powerful method also to collect back links and ultimately increase the ratings and the popularity of blogs. What's that?

The key to get back links actually lies in our readiness to interact with other Bloggers.So, if you'd like your blog link in many blogs, interact with other Bloggers.Nothing else is blog walking ,alias visit blogs out there.

Look for a number of blogs that have a rapport with the theme of your blog, and visit regularly. Do not just visit, but also make a comment on the newest post. Moreover, if the comments are not there. Give your views or to what the Bloggers write and say a little introduction. From here, your relationship with the Blogger is slowly will become closer and closer. Well, then after it is familiar exchange link. Not be easier to ask for or give something (including the links) are already known?

Another advantage is the possibility to leave a comment back links obtain direct link without the need to exchange with the owner of the blog. This applies to the following blog do follow understand where the people who commented will automatically get the back links from the commentary. Of course will be more fair if you also enable do follow facilities in the comments.So, please comment if you want to get back links.

After diligent blog walking and leave comments, of course now your blog will be flooded comment. More important things that you have to do is answer the comments and the blog visitors who leave comments. So, blog walking,comments on the blog, comment came back, that's the cycle continues repeatedly. Easy, is not it? If you still want to exist in the Blogosphere, you should not be bored doing it.

That's just how simple. Hopefully useful.

Click here to get your free mobile phone or apple ipod

Wednesday, January 7, 2009

Photo Slideshow


In the previous post I had share tips about how to make scrollbox on a blog.And at this opportunity I will share tips about how to create photo slideshow.Photo slideshow widely used to enhance the blogger blogs,can also be used to show the banners one by one needed to visit by visitor.A lot of free image hosting service that included a photo slideshow in features such as Picasa, Flickr, and others. But now I will discuss how to create your own photo slideshow on a blog.

* Code needed to make a photo slideshow is below:

<marquee direction="left" onmouseover="this.scrollAmount=0" scrollamount="4" onmouseout="this.scrollAmount=4" widht="400"><a href="link image1" target="_blank"><img heigth="image1 height" width="image1 widht" src="URL image1"/></a><a href="link image2" target="_blank"><img heigth="image2 height" width="image2 widht" src="URL image2"/></a><a href="link image3" target="_blank"><img heigth="image3 height" width="image3 widht" src="URL image3"/></a></marquee>


* for example if we want to create a photo slideshow with code like this:

<marquee direction="left" onmouseover="this.scrollAmount=0" scrollamount="4" onmouseout="this.scrollAmount=4" widht="300"><a href="http://www.flickr.com/" target="_blank"><img heigth="75" src="http://farm4.static.flickr.com/3203/3140631528_7f1a639a8b_s.jpg" width="75" /></a><a href="http://www.flickr.com/" target="_blank"><img heigth="75" src="http://farm4.static.flickr.com/3122/3140631522_92d260cafe_s.jpg" width="75" /></a><a href="http://www.flickr.com/" target="_blank"><img heigth="75" src="http://farm4.static.flickr.com/3006/3140626834_1d00deee17_s.jpg" width="75" /></a></marquee>


*And the result will be like this on a blog:


* If we want to change the photo to the right direction, up or down we only need to change the direction from left to the direction that we want.

Click here to get your free mobile phone or apple ipod

Make Scrollbox


At this time I will share tips about how to make scrollbox on a blog.We can use scrollbox to load a long URL link or we can also load a long paragraph or a lot of image or any contents that we want in a single page.Actually the benefits of scrollbox are many but here we will discuss how its application in a blog provided by blogger.Placement of scrollbox can be on the blog posting, or sidebar or footer.The way to create scrollbox is like this:

*Code needed to make scrollbox is below:

<div style="width: 400px; height: 400px; background-color: b3b3n3; color: cc0000; font-family: verdana; font-size: 12px; text-align: left; border: 1px solid 0000ff; overflow: auto; padding: 4px;"><br/>image1<br/>image2<br/>image3<br/> image4</div>


*Example if we want to load the image that we want something like this:

<div style="width: 400px; height: 400px; background-color: b3b3n3; color: cc0000; font-family: verdana; font-size: 12px; text-align: left; border: 1px solid 0000ff; overflow: auto; padding: 4px;"><br/><img src="https://blogger.googleusercontent.com/img/b/R29vZ2xl/AVvXsEiuAkiEFHhbZK3_30Fax1MMq2N5M7FmWxD5XIOhjioxhNNpQ5PKDd_gFAtDoVL_lAWYav6eE3AK2iPBxIcL4xSPgMwU0_mlKfvpVzkMY2xB8G17UYhOrk75DICufsldwlf9kmjmzpvRdyPB/" /><br /><img src="https://blogger.googleusercontent.com/img/b/R29vZ2xl/AVvXsEg1gCHpz2H_7lSmegYXRvcPmw3rKGuTN0ZCXqWlTtAxSmrEhs-ykZprgJwTuuKM6QEdsbQrqLUjyg9a4hjyisnYK2WVrtW5e0Ubx-1vUphFIqsBczeFnvBCyvNGZpMT-f-8QzbqJk0vBgXw/"><br /><img src="https://blogger.googleusercontent.com/img/b/R29vZ2xl/AVvXsEiAqjiOYeWkxxIkhvXJmwTFhTXJmghB5rxpz-e23GsxYPk5jEgG_C-xRvfph6KDT9cVzXYYfuQhU6iIKpA2okxws1lOQOT6Qm80kexDw7uw_Cpp4dnOUSl4SHaJfWX0e3dVGwuTO0ovfR7Z/" /><br /><img src="https://blogger.googleusercontent.com/img/b/R29vZ2xl/AVvXsEh5P3yULLLyBdVrx8fAjIntTzy8fIlK66YFe5kwG_u5srFaeW66tfkgU47KcJNjMGrs7QIhbMp_iRW074ZaE7DnoZf3LzEMO-fUqZvwXi481-Wt_50vTHvL0SkbFzxow49RGbZE0SAcvY4/" /></div>


*And the result will be like this on a blog:


Dani Pedrosa

Jorge Lorenzo

Valentino Rossi

Nicky Hayden


*And to load another contents that we want on scrollbox, we only need to change the image source code with the contents that we want.
Click here to get your free mobile phone or apple ipod

Monday, January 5, 2009

Create A 2 Column Template Become A 3 Column Template


If you were interested to replace new template or want to redesign your template, It is best to backup your template before you changing any code.This step was as prevented to reduce the fatal risk if the mistake happening in redesign or changing your template. For you that did not yet know how to backup your template, please followed steps below :


1. Log in to Blogger with your account.


2. After entering the dashboard page , click template.


3. Then click edit HTML tab.


4. Click the Download full template link.


5. After you click Download full template link, then will emerge new window just to download. Click the Save button.


6. You could choose this data would in kept where and with what file name what, Afterwards ended with click of the Save button.

7. Finish.


Now you had back up the template, if next time you needed it, you could use this came back.Now I will explain how to create a 2 column template become 3 column template,the steps are as follows:

1.Scrolldown HTML editor on blogger so you find the code as follows:

@media all {
div#main {
float:$startSide;
width:66%;
padding-top:30px;
padding-$endSide:0;
padding-bottom:10px;
padding-$startSide:1em;
border-$startSide:dotted 1px $bordercolor;
word-wrap: break-word; /* fix for long text breaking sidebar float in IE */
overflow: hidden; /* fix for long non-text content breaking IE sidebar float */
}

2.Change the widht from 66% widht to 40% widht because we will make a second sidebar 26% widht and the second sidebar code like this:

div#sidebar2 {
margin-top:20px;
margin-$endSide:0px;
margin-bottom:0px;
margin-$startSide:0;
padding:0px;
text-align:$startSide;
float: $endSide;
width: 26%;
word-wrap: break-word; /* fix for long text breaking sidebar float in IE */
overflow: hidden; /* fix for long non-text content breaking IE sidebar float */
}


3.Scroll down after the <body> tag we will find the code like this:

<div id='main-wrapper'>
<b:section class='main' id='main' showaddelement='no'>
<b:widget id='Blog1' locked='true' title='Blog Posts' type='Blog'/>
</b:section> </div>

4.Then cut and paste the code above after the code first sidebar:

<div id='sidebar-wrapper'>
<b:section class='sidebar' id='sidebar' preferred='yes'>
</b:section>
</div>

5.Then cut and paste the code as a second sidebar below after the new location of main wrapper code,the second sidebar code will be like this:

<div id='sidebar-wrapper'>
<b:section class='sidebar2' id='sidebar2' preferred='yes'>
</b:section>
</div>

6.If we combined the code after the <body> tag above will be like this:

<div id='sidebar-wrapper'>
<b:section class='sidebar' id='sidebar' preferred='yes'>
</b:section>
</div>
<div id='main-wrapper'>
<b:section class='main' id='main' showaddelement='no'>
<b:widget id='Blog1' locked='true' title='Blog Posts' type='Blog'/>
</b:section> </div>
<div id='sidebar-wrapper'>
<b:section class='sidebar2' id='sidebar2' preferred='yes'>
</b:section>
</div>

7.Then save the template and we already have a 3 column template.

Click here to get your free mobile phone or apple ipod

Letter


For the new blogger, we will enjoy new facilities from blogger.com, we can set font type (letter) and the font color is easy. Below is the step to set the Fonts and Colors (especially for new bloggers with a new template, and for bloggers who use a classic template, this menu is not provided). Click the "Fonts and Colors", it will be shown some of the settings: (for this particular template "minima")

1. Page Background color : background color of the blog. Please click on the color you have the right in like that.


2. Text Color : color settings text from the post.

3. Link Color : color settings in the link.


4. Blog Title Color : color settings Blog title.


5. Blog Description Color: color hurup description of the blog.


6. Post Title Color : color settings title of the post .


7. Border Color : color settings box that beset the blog title, and the dividing line.


8. Sidebar Title Color : color settings titles in your sidebar (side column).


9. Sidebar Title Color: color settings in the sidebar (side column).


10. Visited links Color : color settings when a visitor press link to any posts that contain links.


11. Text Font : text types of settings, font to apply the results of a text post or in the sidebar.


12. Sidebar Title Font : text types of settings for the title in the sidebar and the date of posting.


13. Blog Title Font : the type of blog Title.


14. Blog Description Font : Settings of decryption blog.


15. Post Footer Font : the type of footer (eg posted by).


16. Click "Save Changes" to the end, and done.


For in addition to the template "minima" basically the same templates, just have a little difference and easy to use.

Click here to get your free mobile phone or apple ipod

Friday, January 2, 2009

Hide Navigation Bar


For user blog provided by Blogger, on the top of blog will appear something what we called navigation bar (nav-bar). Nav-bar actually has many functions, including: we can move to another blogs by pressing the "next blog" on the nav-bar. A blog that we visit will be visited us back,as feedback.
But if we want a blog look neat that sometimes have a way to hide nav-bar on the blog provided by Blogger, as following:
1.Login to Blogger with your account.
2.On the dashboard menu select layout.
3.On the layout menu select edit HTML and copy-paste the code below under the outer wrapper like this:

# navbar-iframe (
height: 0px;
visibility: hidden;
display: none;
)


4. And next click save and we will see the results.

Click here to get your free mobile phone or apple ipod

Sunday, December 14, 2008

Edit Template


Again, I question the template. There may be some of the comrade who have all felt very like a template, but there are difficulties the column width is not suit us, both the column width or sidebar mainbar (column where the post). Occasionally the column width of a template in a sense too wide or too narrow, if such a thing, I have good tips However in order for a wide field in accordance with our own desires.

To know the column width of a template, we can through it to its CSS style sheets. But of course there is a difference between a template with a template that other, this of course is up to the designer to its own template. As an example for the header, if the standard template blogger in the CSS style sheet is called the header, but for the template-designer-made templates of other bloggers out there who call Banner or the names of the other. A name will not necessarily affect the results you can be in, in the name of this life is just so easy to remember or recognize users by the template if you want to do edit template.
So that not too confusing, I take the example minima 3 column template . After viewing the growth of this template was a lot like it. If you are not satisfied with the width of the columns in the template, please follow the tips below , wide columns in accordance with the wishes comrade. Where is the location codes to set the column width? I give an example:


# header-wrapper (
width: 900px;
margin: 0 auto 10px;
border: 1px solid $ bordercolor;
)

# outer-wrapper (
width: 900px;
margin: 0 auto;
padding: 10px;
text-align: justify;
font: $ bodyfont;
)

# main-wrapper (
width: 435px;
margin-left: 20px;
margin-right: 20px;
float: left;

)

# sidebar-wrapper (
width: 220px;
float: right;
)

# newsidebar-wrapper (
width: 200px;
float: left;
)


As shown in the code above, that affect the width of my column is printed in red. Width,so get simple for it. 900px is a value that is equal to the width 900 pixels.

To better understand, code I describe above:

# header-wrapper (
width: 900px;
margin: 0 auto 10px;
border: 1px solid $ bordercolor;
)

This means the header-wrapper has a width of 900px and have a border (I'd mean border is a frame or margin) of 1 pixel with a solid line (solid line = full. Dashed line = broken. = Dotted line form of dots) with the colors in the border that could change-change (in the font and color).

header-wrapper is only naming it, is not absolute. If the change in the name of the head also does not do anything. width: 900px; mean width of 900 pixels.SO this is the value of 900 pixels that can change the suit , want to get more value added width, or in reducing get smaller.But I suggest, the value of this header must be the same as the value of the wide body to look good. border: 1px solid $ bordercolor; the header is to have any margin of 1 pixel, if you want to live more bold comrade add value, or if you want a margin is the only comrade remove this code.


# outer-wrapper (
width: 900px;
margin: 0 auto;
padding: 10px;
text-align: justify;
font: $ bodyfont;
)

This means the outer-wrapper has a width of 900px, the distance gap of 10 pixels align it with a flat left-and right kind of letter that could change in the change-over bar and the letter color.

outer wrapper is just a name only. width: 900px; means 900 pixels wide. 900 pixels wide which is provided for in the fields of, say only in this column main-wrapper, sidebar-wrapper, and newsidebar-wrapper. So in other words is the result of the outer wrapper Answer column width main-wrapper, sidebar-wrapper, and newsidebar-wrapper. When comrade incorporate content that exceeds the width of each column, then automatically also exceeds the width provided by the outer wrapper and that happens is one of the fields will be pulling down to this and make us a dreadful sight for the eyes. So if you want to change a wide field between the three, the width of the outer wrapper also have to be adjusted and changed.


# main-wrapper (
width: 435px;
margin-left: 20px;
margin-right: 20px;
float: left;

)

This means that the field has main-wrapper width of 435 pixels with the right margin of 20 pixels, the left margin and 20 pixels in this column placed left.

wrapper is the main-page column posts, what we will post the entry to this page. width: 435px; this means that the width of a column of 435 pixels, but because of the margin-left and margin-right, then the actual column width is 475 pixels. But the pause is only 40 pixels in order to limit the field only to be seen not touch. When comrade feel this column is too narrow or too small, you can add value, for example 550 pixels. When comrade intend alter this column, a column outer-wraper also must be added value. examples when the main-wrapper want to be 550 pixels, the 550px-475px = 75px. This means that the outer-wrapper column should be added as 75px, so 900px +75 px = 975px.


# sidebar-wrapper (
width: 220px;
float: right;
)

This means the column sidebar-wrapper has a width of 220 pixels and place it in the right screen.

Column sidebar-wrapper is a sidebar column or columns in the place where we store various accessories or do other. width: 220px; means have a width of 220 pixels, if you want to narrow or in the enlarge, we only need to change the value pixel only. But when the value of this column, do not forget to change the value in the space provided by outer-wrapper. example: if this column would like to become enlarged 250pixel the additional pixels is 30 pixels, so do not forget to add in the same outer-wrapper.

# newsidebar-wrapper (
width: 200px;
float: left;
)


This means newsidebar column-wrapper has a width of 200 pixels in the fields and in place on the screen to the left.

Like sidebar-wrapper, new sidebar column-wrapper is also the place or store various accessories blog tool. in this column so that we can create more load various accessories that we want. Column newsidebar-wrapper this is 200px wide, well when the change intend to stay the course pixel value, but do not forget to add in the same outer-wrapper.

Click here to get your free mobile phone or apple ipod

Blog Setting


If your blog want to be indexed by Google, you must doing several settings. This is how to setting your blog:

1. Log in to Blogger.com with your account.


2. If your blog more than 1, click at the blog title want to setting.


3. Click Setting and then click Basic. Several form that must in the contents to the menu basic:


* Title : Content with your blog title. Example : Blog Tips.


* Description : Content with your description blog. Example : All about blogging resources.


* Add your blog to our listing : chose Yes, so that every time posting always entered the Blogger.com list.


* Show Quick Editing on your blog : Chose Yes.


* Show Email post link : It is best to chose Yes, but if you chose No also it's allright.


* Show compose Mode for all your blog : Chose Yes.


* Show transliteration button for your post : chose Yes if the you wanted to be button to change normally alphabet to hindi (India) alphabet, Chose No if being the reverse.


* Click Save Settings.


* Finish.


4. Click Publishing to arrange the publishing menu.


* Blogspot Address : Content with your blog address. Example : blog-tips


* Send Pings : Chose Yes.


* Click Save Settings.


* Finish.


5. Click Formatting to arrange the formatting menu.


* Show : Chose the number of post want you to display in your blog. Example : Show : 6 post, it's means your posting will display in your page Totally six posting. Chose Post at scrolldown menu.


* Date header Format : Chose the style of date/month what you wanted, this date/month will display above your post.


* Archive Index Date Format : Chose the style for your archive.


* Time Format : Chose the style of the time, what you wanted.


* Time Zone : Chose the matching zone with your place. Example for WIB : [UTC+7.00] jakarta.


* Language : Chose language what you wanted.


* Convert line break : Chose Yes, but if you chose No it's allright.


* Show Link Field : Chose No, but if you chose Yes it's allright.


* Enable Float alignment : Chose Yes, but if you chose No it's allright.


* Click Save Settings.

* Finish.


6. Click Comment to arrange the Comment menu.


* Comments : Chose Show.


* Who Comment? Chose Anyone. It's means anyone can comment to your post.


* Comments Default for Post : Chose New post Have Comments.


* Back links : Chose Show. It's means you will know if another people has linked to your post.


* Backlinks default for Posts : Chose New post have Backlinks.


* Show comments in a popup window? : Chose Yes. It's means when the people click Comment link your blog not lost.


* Show word verification for comments? : It's better to chose Yes.


* Enable comment moderation? : Chose No, but if you wanted chose Yes it's allright.


* Show profile images on comments? : Chose Yes. It's means the photo of commentator of blogger member can display.


* Comment Notification Address : Content with your email address.


* Click SAVE SETTINGS.


* Finish.


7. Click ARCHIVING to arrange the archiving menu.


* Archive Frequency : Chose monthly.


* enable Post Pages? : Chose Yes.


* Click SAVE SETTINGS.


* Finish.


8. Click Site Feed.


* Publish Site Feed : Chose Yes.


* Descriptions : Chose Full.


* Article Footer : If you have advertising code like Google Adsense, you can insert the code here.


* Click SAVE SETTINGS.


* Finish.

Click here to get your free mobile phone or apple ipod

Template


If you were interested to replace new template or want to redesign your template, It is best to backup your template before you changing any code.This step was as prevented to reduce the fatal risk if the mistake happening in redesign or changing your template. For you that did not yet know how to backup your template, please followed steps below :


1. Log in to blogger with your account.


2. After entering the dashboard menu , click Layout.


3. Then click edit HTML tab.

4. Click the Download full template link.


5. After you click Download full template link, then will emerge new window just to download. Click the Save button.


6. You could choose this data would in kept where and with what file name, Afterwards ended with click of the Save button.


7. Finish.


Now you had back up the template, if next time you needed it, you could use this came back. But must be known, backing up the template like steps above could not back up the data inside widget.

Click here to get your free mobile phone or apple ipod

Custom Search